yet another blog about computer, technology, programming, and internet

Showing posts with label Troubleshooting. Show all posts

Tuesday, March 23, 2010

Forcing a Screen Setting in Windows 7

Tuesday, March 23, 2010 Posted by Ismail Habib , 16 comments
I was trying to install a new screen on my laptop when I realized that it was not as easy as I expected. This screen was huge (compared to my laptop's screen) with a very high resolution (1920x1080) setting suggested. However, with 1920x1080, the only refresh rate available is only 29Hz and 30Hz, which would make my screen looks very flickeringly sharp (I don't even know if it is a word). Updating the driver of my VGA card and the screen doesn't help at all.


The fix was surprisingly easy and funny though. I went to the Screen Resolution adjustment, clicked on the "advanced" link. Open the "Monitor" tab, and unchecked "hide modes that this monitor cannot display". The available modes then changed, and I picked 60Hz as the refresh rate. Things went went from that moment on.

Moral of this story: sometimes you are allowed to force your Windows to do something, especially when it underestimating your expensive hardware :P

Tuesday, November 24, 2009

Changing Screen Resolution in Ubuntu under VirtualBox

Tuesday, November 24, 2009 Posted by Ismail Habib , , , 15 comments
This problem has caused me a relatively severe headache today. I'm doing a project which require me to use a Linux OS. Since I don't have Linux in my office PC, I decided to install one (Ubuntu 9.10) in a VirtualBox instead of creating a double booting configuration. The installation procedure was easy and painless, but then the problem is coming. The installed Ubuntu does not have any option to increase the screen resolution other than 800x600 and 640x480.

I tried to install the suitable driver with no result except destroying my X Window which forces me to reinstall the Ubuntu again (thank God I use virtual machine...). Then I started looking around for a solution and several forums and websites point me to this:

  • Choose Devices -> Install Guest Additions... on the VirtualBox menu
  • It will mount a CD which will appear on the Desktop
  • Go to your terminal (Applications -> Accessories -> Terminal)
  • Go to the CD directory by typing "cd /media/cdrom0" (without the quotes)
  • Type "sudo sh ./VBoxLinuxAdditions-x86.run", again, without the quotes. At the first try I couldn't find this file instead just a directory "OS2". If you experience the same thing, this is probably because you set your VirtualBox OS type as "Ubuntu" instead of "Linux 2.6". In this case, shut down your VirtualBox, change the OS type and redo the whole stuffs from the beginning
  • Restart your VirtualBox


Now, this has successfully gave me another resolution, which is 1024x768. Not bad, but I'm rather greedy and I want something more! (Hey, my PC could do better!). Continue with this:
  • Go to the terminal again
  • Edit the xorg.conf by typing "sudo gedit /etc/X11/xorg.conf" (yes, no quotes)
  • If you can find some already existing screen resolution, then you can add more, otherwise you can include something like this:
Section "Screen"
        Identifier "Screen0"
        Device     "Videocard0"
        DefaultDepth     24
        Subsection "Display"
                Viewport   0 0
                Depth     24
                Modes     "1280x1024" "1024×768"
        EndSubSection
EndSection

  • Be really careful when you're doing this. It is always nice to make a backup beforehand
  • Restart your VirtualBox and enjoy the new screen resolution


Reference:
1. http://www.mikesouthby.co.uk/2009/11/virtualboxubuntu-9-10-changing-screen-resolution/
2. http://www.mjmwired.net/linux/2009/09/15/default-xorg-resolution/

Sunday, June 08, 2008

Creating Thumbnails from a Video

Sunday, June 08, 2008 Posted by Ismail Habib , 16 comments
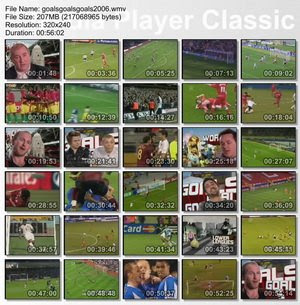
Usually when you want to share a video, people often ask for screenshots. Sometimes it is better to give several small thumbnails rather than just one big screenshot. This simple tutorial will tell you how to do such thing with ease.

First, you will need the Media Player Classic (MPC). It is a free software that you can get from sourceforge. If you are using Windows XP then you just have to download it here.

Now you already have the MPC, follow these instruction:
  • Extract the zip file and run the mplayer.exe
  • Open the video you'd like to use as a source
  • Click on File -> Save Thumbnails

  • On the dialogue box, specify your output filename and type (jpg or bmp). You can also specify the number of thumbnails you want to make by setting the number of rows and colums. You can also specify the witdh of the output file.
  • Press Save and leave everything else to MPC
  • Now you have your thumbnails

Important note:

If you get the error message "Get Current Image Failed, hr = 8000ffff", do this following:
  • Click View -> Options
  • Open Playback -> Output

  • Change the DirectShow Video from Overlay Mixer to anything else (I have tried VMR7 windowed and VMR9 renderless and it's work perfectly)
  • Click OK
  • Restart your MPC

Monday, September 10, 2007

PPPoE Problem: unavailable - device missing

Monday, September 10, 2007 Posted by Ismail Habib 21 comments
Last week I tried to make a new PPPoE connection to my campus. I did it before and everything went fine, but not last week. I couldn't do the dial and when I saw the dial-up icon this not-so-funny-message under the dial-up icon: unavailable - device missing. I went crazy for sometimes before I found this solution:

1. Download devcon.exe from some Microsoft sites

2. Open netrasa.inf in c:\windows\inf (c:\winnt\inf on win2k I guess)

3. Look for the section [Msft.NTx86]

4. In the DeviceID column, you can see the installable devices.

5. Run this command to install the WAN Miniport (PPTP):
devcon.exe install c:\windows\inf\netrasa.inf MS_PptpMiniport

6. Install the other devices similarly. (Probably you will need MS_L2tpMiniport, MS_PtiMiniport, MS_NdisWanIp, MS_PppoeMiniport additionally)

It worked. I didn't even bother to try to understand anything :P

Solution found at http://www.daniweb.com/forums/thread18016.html